Create back to top option dynamically on scroll change for long
pages. No plugin and complex integration, just add small script process
code and use it in page. Back to top option created using CSS and
jQuery.
Back to top is suitable for website with lots of page content. Once
user scroll page, back to top option display on right bottom area. On
click it page will smoothly scroll to top of page and hide option.
Adding Back to top process code
Back to top process code is small code snippets that will create
dynamic top option and bind its event for scroll page to top. Just add
code anywhere in page using script tag.
var backToTop = {
set: function(){
var sTopHtml= '
For activate back to top process code, we need to add below code in
document ready function. Add backToTop.set() for create html top button
option and bind its event. For hide show button on scroll change need to
add backToTop.scoll() code in window scroll event.
For set back to top option bottom right ‘.s-top’ class used. Add
below style code in css file or in page with style tag. Change back to
top button style from ‘.s-top’ class to match with page design.
A great way to put some animation effects on specified element is CSS3 animation.
1. @keyframes
@keyframes allows us to divide animation in frames. Without keyframe
animation won't work. You can specify initial and final property by using
percentage or using keywords like “from”, “to”.
With the help of Animation
name property you can specify the name to the animation. It helps you
to create unique identity of specified animation effect. Animation-name
will be used in the syntax of @keyframes.
Example. animation-name : sushrut;
Animation-duration :
This property represents the duration of the animation. The value of this property is generally written in seconds or milliseconds.
Example. animation-duration: 3s;
Animation-timing-function :
Sometimes animation varies speed from between its stars to end. To control its speed Animation-timing-function is used.
Example: animation-timing-function: ease-in;
Animation-timing-function values.
Linear: Maintains same speed thoughout animation
Ease: Start with fast speed and ends with slow speed.
Ease-in: Start with slow speed and ends with fast speed.
Ease-out: Looks same as Ease.
Ease-in-out: Start with slow, increases speed at middle and ends with slow speed.
It represents the speed of the animation. The value of this property is
generally written in seconds or milliseconds. More seconds means more
delay.
Example. animation-delay: 3s;
Animation-iteration-count :
Animation-iteration-count represents the frequency of the animation.
Example. animation-iteration-count: 5;
Animation-direction :
Animation-direction defines normal and reverse direction.
Example: Animation direction: alternate;
Animation direction values.
normal: Animation
will work normally. Animation will start from starting frame and ends
with ending frame. Again start with starting frame and so on.
reverse: Animation
will be reverse. Animation will start from ending frame and ends with
starting frame. Again start with ending frame and so on.
alternate: Animation
will start from starting frame and ends with ending frame. Then start
with ending frame and ends with starting frame and so on
alternate-reverse:
Animation will start from ending frame and ends with starting frame.
Then start with starting frame and ends with ending frame and so on.
Animation compatibility extension according to browser.
If you have read the following example, you will see that, I have added same code twice and added webkit
extension in one of them. Why I have done that? Because I want,
animation should work for all browsers. If I run the code without using webkit, then animation will not work on Google Chrome, Opera and Safari. Animation will work on Mozilla Firefox.
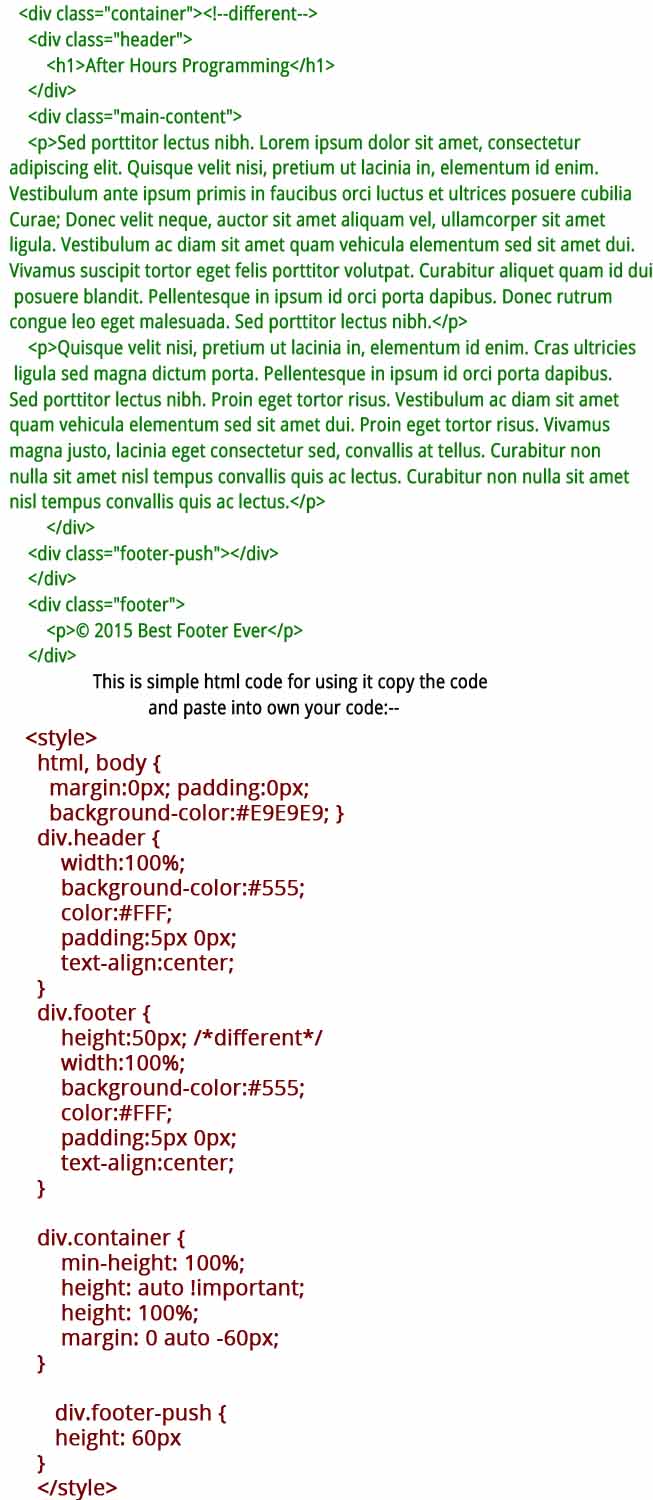
Each website's structure is followed by a header, middle section, and footer. Users now expect it and appreciate the consistency. But in some cases footer is a bit tricky if a page does not
have a considerable measure of content.
Most commonly, we need a footer that
'stick' to the bottom of a page and not the bottom of a browser, that footer is
also called a 'sticky footer'. If your web page has a very little content and footer is not stick to the bottom then the site looks irritating.
Setting the
footer at absolute bottom of a site page has been an issue for a long
time, but I will reveal to you a complete HTML and CSS full solution.
Many website's footer displays in the middle of the page,
which is never where we want a footer. Sure, we could strap the footer
to the bottom of the window, but a footer that moves with the page is
almost as annoying. So, how can we push a footer to the bottom of a page
for both pages with a lot of content and those with little content.
It's easy with a simple little trick that all browsers since IE 6
understand.
We could have used JavaScript to push the footer down to the bottom
of the page, but why use JavaScript when CSS will do? The last important
note is that some footers are bigger than other, which means you might
have to modify the footer's height in order to have a footer that you
like.I hope this example really helpfull as much as me , and that your
"sticky footer" problem is solved now.
Web designing is an continuous learning process. It is that aspect where new
innovations and developments emerge frequently. Therefore it is essential for every web designer to enhance and update their web
designing skills constantly. Designers have to design their
website which is eye catchy and it impose
the target audience instantly. It is possible only when the
site stands out from its competitors in all the aspects.
Tips for web designers to improve their designing skills:
Be innovative:
It is required for web designers to be ahead of times in
terms of technology and new trends. They should find
newer ways to make their designs trendy, Creative, and informative. With the help of newer trends and templates customers can be easily roped in and the website gets huge traffic.
Learn and identify good designs:
In order to built good designs it is necessary for the web designers to recognise the difference between the good design and the worst ones. This emerges from
constant earning and experience. The more experience the designer is the
faster one can perceive the better design.
Research on design theory:
In the fast moving competitive marketplace, Designers has to be in the game , they needs to understand the stuff from the source. It is vital for every web
designer to read about new design techniques or trends and most importantly follow it and
incorporate it in their designs so that they are able to create a WOW effect on their designs.
Read books blogs and tutorials :
A
successful web designer is one who continuously reads web designs related blogs or tutorials to keep
updated. Constant reading of
such magazines will aid valuable insights to the designer. Also reading
daily blogs, articles pertaining to latest design trends will give
updated insights on the work.
Build healthy relationships:
It is vital for
the web designer to be involved in conferences, events, workshops etc for Active online and offline presence.
This act will enable exchange of ideas and will increase the coverage of
the potential clients of the web designer.
Constant learning of new aspects, eagerness to adapt to new changes enable the web designers to excel in their field.
For any required Web Design services, Feel free to contact us at : M2Soft
Many new design tools entered in the market This year. internet-makers are fighting back with a plethora of
tools that aim to make your life as a designer that little bit better.
Static mockups are becoming less useful and the lines between
designer and developer are becoming increasingly blurred. As we work
more collaboratively with one another the tools we use are having to
change.
Our experts have picked out some top tools that are changing the way we think
about design, and are key to helping us establish these new processes...
Pixate is an app that has been created for making intuitive,
interactive prototypes for iOS and Android. What sets Pixate apart from
other tools I've used is its drag-and-drop animation and interaction
panel.
To make an element interactive, all you need to do is simply select
the interaction you'd like to use, be that double-tap, drag, tap or one
of the other native interactions it provides.
Drag this onto your element, set some variables, and voilà – using
the Pixate iOS or Android app gives you a real-time working prototype on
your device.
The app allows you to build up an asset library really quickly. To
start creating your prototype, just drag and drop your assets into the
app and you’ll find them in your layers palette ready to use.
Affinity app is
incredibly well designed and it feels like it’s been made to be a
dedicated web and graphic design tool. There were a few features that we really enjoyed, including adjustable
nondestructive layers – which essentially means you can adjust images
or vectors without damaging them.
The 1,000,000 percent zoom was just bliss (very often Photoshop's
32,000 feels like it's just not enough). This is especially useful when
working with vector art, as you can really get in close. The undo and
history features are also really handy – Affinity allows you to go back
over 8,000 steps!
When it comes to designing, the UI feels familiar. When moving from
Photoshop, everyone seems to want to start over, which can pose a real
challenge.
What Affinity has done is kept the layout familiar while tightening
everything up and hiding distractions. I was easily able to jump
straight in and get designing.
Overall, Affinity feels like it could be a real competitor to
Photoshop, Illustrator and Sketch, and at just £34.99 it's a real
bargain!
Avocode makes it extremely easy for a frontend developer to code
websites or apps from Photoshop or Sketch designs. It's built by the
same team that brought us CSS Hat and PNG Hat, so it's not surprising
they've taken the exporting process one step further here.
Although previous apps have allowed you to export assets, what makes
Avocode really special is that you can use its Photoshop plugin to sync
your PSD into Avocode with just one click.
Avocode quickly and automatically analyses your PSD or Sketch file
and brings everything into a beautifully designed UI. You then have full
control over how you export assets, including SVG exporting as
standard.
You can also click elements in the design, and copy and paste the
code into a text editor of your choice. It looks like there's going to
be Atom integration soon, which will make this process even slicker.
"It gives users everything they need for coding – a preview of the
design, and access to all layers and export assets," says Avocode
co-founder Vu Hoang Anh. "The best thing is that developers won't need
Photoshop or Sketch at all. The current workflow really sucks and that's
why we created Avocode."
Antetype is a new tool for creating responsive UIs for apps and
websites. It create high-fidelity prototypes, but not production files. This is
actually a good thing – the team is focused on exactly what it is
creating, and it's not trying to make an app that replaces developers.
Tim Klauck, UX Director at Antetype said :
"Frustrated using photo editing tools for UX design, we wanted a tool
designed for UX design with a better understanding of content and
layout,"
"Auto-layout and
widgets allow us to rapidly iterate our designs while maintaining
consistency."
On download you're given a fairly basic widget library, which you can
use to quickly create prototypes and start designing. Antetype provides
a library of devices and OS designs including iOS, Android and Windows
to start with. There is also an active community section on the site,
where you can download UI kits from other Antetype users.
The thing that sets Antetype apart from other prototyping tools is you can actually create responsive prototypes and add some
neat interactions – ideal for presenting ideas to a client.
Sketch has gained a massive following since it launched in 2009. The latest version includes great new features such as
improved exporting, symbols and simplified vector modes.
Pieter Omvlee, founder of Bohemian Coding said :
"When we set out to build Sketch, we envisioned an app for the modern
digital designer,"
"We have tried to do that with key improvements to basic
functionality and radical new features. We've been humbled by the
enthusiasm with which people have started using Sketch and the amazing
work they have created already."
I had used the last version of Sketch for a limited time but found it
to be buggy and not to my liking. However, after using Sketch 3 for a
few hours I was pleased to see those bugs had been ironed out and the
app overall much improved. It's great to see features such as the new
grid tool, which makes it easy to create grids for your designs.
I also really like how Sketch has incorporated CSS logic into the
app. This makes converting your designs into CSS much easier, as you
have to use CSS logic when applying styles. Another feature which is
really handy for speeding up the design/development crossover is
Automatic Slicing.
Without having to manually add slices, Sketch can create assets using
one-click export, which will be exported at 0.5x, 1x, 2x and 3x and in
various formats such as PNG, JPG and TIFF. I'm looking forward to seeing
what Sketch does next.
Form is not a
typical design tool in that there's no tools or layers palette. Using
the app feels like a mix of design and code.
While you can't actually create graphics in the app, you can insert
them and use what Form calls 'patches' to add gestures and interactions.
The Mac app requires you to also use the iOS app so you can view your
prototype in real time and interact with it.
"Form is an app design and prototyping tool with the goal of
producing designs that are closer to what you get in production,"
explains Relative Wave creative coder Max Weisel. "We want designers to
work directly on the production side of an app, and at the same time
free up engineers to focus on more complex problems."
There are some great tutorials on how to use Form, but the process is
rather complex if, you are used to creating visuals in
Photoshop. Moving an image to the centre of your device, for example, is
achieved using Superview variables and Match Patches.
Once in place you use maths to divide the width and height and
connect them to the X and Y positions in Image View. Group those
together, rename the variables and adjust the X and Y anchor points. This process is fairly complex.
However, once you get your head around the processes, you can create
stunning prototypes. Having access to the device's camera and other
sensors means the prototypes you create are just as powerful as the
coded app would be.
In order to be a great web designer and keep up with the growing competition it is necessary to follow trends of web design. But sometimes designers overthink or overlook some of the most important details, especially for usability.
Here are some web design trends that you must avoid when creating a website :
1. Use of Unclear fonts or Small text
Problems:
Strains readers’ eyes
Visitors are more likely to click away than read small text
Unclear text can not be read by users properly.
Solution: Increase your fonts size and use clear fonts that makes on-screen reading comfortable.
2. Clever, but unclear navigation
Problems:
Visitors will become confused
Visitors will click away when the can’t immediately figure out how to navigate
Solution:Use standard, consistent navigation.
Because visitors are already familiar with these schemes, they can
easily work their way through your Web pages.
3. Floating Elements
Problems :
People who have small screens can’t fully see the content available.
It’s obnoxious.
Design-wise, they don’t look good at all.
Solution : Don't make use of floating elements.
4. Unnecessary reflections below objects
Problems:
Distracting
Overused
Solution:Use reflections only where they fit
logically into the design. For example, if you have an image of water or
a wet surface, a reflection would make sense. Avoid them on regular
Web pages. If you want to create a sense of depth, try using a shadow
instead.
5. Blinking images
Problems:
Distracting
Unprofessional
Solution: Find a new way to add emphasis to an
important element or idea. There are many ways to do this. You can
redesign your page to give the most important elements the largest
space, use contrasting color or elements to draw a visitor’s attention
to the most important parts of the page.
Remember,designing is all about making people comfortableand to help them use your website with great ease, not to make them feel frustrated.
Attracting
a potential customer, grabbing their interest and retaining then is a
difficult task. It is important to deign a site that does not
frustrate customers there by maximize customer retention.
"What not to do while
designing a website"
1.
Bad navigation :
Nothing frustrates a website
visitor more then a website hard to navigate. complex or inconstant
navigation can cause user to feel helpless and confuse.
2. Too many ads :
Visitors feels suffocating with so many ads around the website
(pop, flash). Dont fil entire browser with ads.
3. Bad content structure :
Bad content structure can destroy your conversion and retention
rates. make your content easy to find. It is estimated that more then
50% of sales are lost because potential customers can't find what
they are looking for.
4. Obtrusive audio or video :
Having audio or vidio that loads automatically can potentially
drive visitors away.
5. The registration requirement :
Forcing visitors to register before he/she view the content is
much like physical barrier Force registration may ultimately cause
visitors elsewhere for what they are looking for.
In the present scenario, having a online presence of your business is an important component in the process of marketing. The objective of building a website is to
market your products and services online. And for that, It is necessary to
ensure that maximum number of people visit your website.
A website represents your company or organization worldwide so the design of your website plays an important role in building a committed audience. Either You can go for
an SEO-friendly Web design to make your website rank high in search
engine results Or you can just follow a few tips on Web design to
increase visits to your website to generate maximum leads and
revenue.
Here are some Web design tips for beginners to increase visits to your website to generate maximum leads and revenue.
1. Manage the Content Prudently :
content
remains king when it comes to the world of websites. But if you can’t use it properly, Even excellent content will be of no
use. This is where Web design becomes
relevant. It helps to manage content in the most effective manner.
Prepare a web design that manages content in an effective way to attract the maximum number of Visitors.
2. Use a Responsive Design :
Maximum amount of internet is shifting over mobile devices ( Smartphones, tablets).
So your website need to appear perfectly on all kinds of devices. These devices help your visitors
to remain connected with you VIA responsive web design. In fact, mobile traffic has tripled in the last three years. So obviously, it’s important for this audience to be able to see your website properly.
Navigation are provided to help users go from one page to another. It is a roadmap for visitors to find there desired results. but what if he/she cannot find his/her way through the website easily. He/she will not wait and left the site. It might be possible will never come back. This clearly demonstrates the role well-planned navigation plays in
increasing and retaining traffic. Visitors should be able to
move to other relevant pages of the site with ease. Only then can you
expect people to stay on your site for a longer period.
Just ask yourself, would you buy anything from a shop where the
products are kept in a disheveled manner – or, would you go for one
that has a well maintained look? Surely, the latter.
The same holds true for a website. You need to design the landing
pages of your site properly. The homepage should be dynamic enough to
engage visitors in no time at all.
5. Integrate a Blog on Your Website
A blog offers information and insights to the
reader. If the blog content is unique and high quality, you will notice
that visitors return to it. They also subscribe and follow
updates of your blog regularly. How this helps you is :
You can add social media buttons to blog posts to ensure that they are shared on different platforms, increasing your reach.
Blogs increase website content and this content is essential to generate better organic search results.
You can create backlinks to your website pages from the blog posts.
It’s a win-win situation.
These are some helpful tips for the beginners to increase traffic to their website through web design.
As a web design company we know how to make classic web design with latest trends. Our experts some website features to be avoid which looks ugly.
just make sure you stick with classics and leave the trends out of
it. Lets have a look....
1. “Creative”
fonts :
Use of creative font will not allow users to Clearly understand the text on your website. So Choose a font that’s classic and has been around the block a few
times—specifically a sans-serif font. Calibri and Verdana are safe
choices.
2. Glittery pink flash animation :
Use of Glittery pink flash animation doesn’t belong on
a professional site. In fact, any type of flash animation can slow down a website and interfere with your SEO efforts.So adopt a static
site with responsive design and mobile optimization built in.
3. Hidden nav bars :
It might seem “fun” to hide these
navigational tools within the homepage. But nobody waste time to search Hidden navigations on the home page.Your job is to make it as easy
as possible for people to navigate your site. So make navigations which are visible and easily accessible.
4. Auto anything :
This goes for music and videos alike. Put your visitors in control of their
website experience and they’ll be more likely to stick around. Don't make any video or music auto that that irritate visitors of your website.
Share your views on this article ... VIA COMMENTS.
As we all know a huge amount of internet has been shifted to the mobile devices
( smartphones, tablets). So having a Responsive Web Designis must in this competitive market place.
Today i am here with some ways to test your Responsive Web Design. have a look...
Ways to test Responsive Websites
1. Aptus :
Aptus is one of my favourite method. it is a little Mac application allows us to test responsive websites.
allows To :
A. setup multiple breakpoints for testing your site on several
devices
B. change the user agent for the
browser as well
by the help of this you can test your website using any "Modern" broeser.Aptus It is not free, but it cost only $2.99 from the Mac app store.
2. Responsinator
If you don't use the apps or you don't have mac then there is a in-browser tool that is Responsinator. it is easy to use and well designed tool. it doesn't offer user agent modification means you will have to load it up in many browsers. But it offers a good selection of device size for testing. Its free of cost.
3. Screenfly
It is also a browser-based tool, but it has much richer tool then Responsinator.This tool offers multiple breakpoints including
mobile, tablet, desktop, and (surprisingly) TV and you can also rotate displat and enable/disable scrolling on the web page.
4. Responsive Web Design Testing Tool
Its again a browser based tool. it is a simple RVD testing tool offers Multiple device sizes and just pixel dimensions. This tool can be forked on github. Again this tool doesn't offer user agent testing but it is still a nice tool.
5. Adobe Edge Inspect
Adobe edge inspect is a part of Adobe’s Creative Cloud platform. It allows you to test your responsive web designs to multiple mobile devices. But you will actually have to have the devices in order
for this to function and you need to install an app on said devices in order for your desktop to communicate with it.Basically this
app syncs whatever you’re looking at in a desktop browser with the
app’s built-in browser and allows you to interact with and refresh the
pages as needed. Providing you have multiple devices for testing, this
is an absolutely amazing tool.
Please Share your experienceor any suggestion with us .. VIA COMMENTS
 Back to top is suitable for website with lots of page content. Once
user scroll page, back to top option display on right bottom area. On
click it page will smoothly scroll to top of page and hide option.
Back to top is suitable for website with lots of page content. Once
user scroll page, back to top option display on right bottom area. On
click it page will smoothly scroll to top of page and hide option.